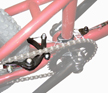
Figure 1:
U-brake
With the U-brake system (Figure 1, the brake lever is connected to the brake by a cable. By squeezing the lever, pressure is applied to the wheel rim by brake pads. This slows the rotation of the wheel, which slows the bicycle.
This system consists of several parts:
• Rim
• Brake lever
• Brake cable and housing with straddlewire or link wire
• Brake caliper
Never use rims designed specifically for disc brakes. Rim brakes require a flat sidewall on the rim for proper braking action.
The brake can easily be opened if needed.
Since they are part of this system, also read about brake levers.
U-brakes use several different cable routing systems (Figures 2-3) that essentially have the same function.
|
|
Figure 1: U-brake |
|
|
Figure 2: U-brake with straddlewire crossing around the seat tube |
|
|
Figure 3: U-brake with dual cables |
Before every ride squeeze the brake lever firmly. It should not be possible to pull the lever fully to the handlebar. When the brakes are not applied, the brake pads should be 1-2mm from the rim. Brake pads should be aligned with the rim surface (Figure 2). If your brakes are too tight, too loose, or not centered on the rim, adjust them before riding the bicycle.
Figure 2 shows toe-in, an angular alignment of the brake pad, which can be adjusted to prevent squealing of the brakes. Used brake pads, or some new direct-pull type brakes, may not require toe-in.
Every month check the brake cables on your bicycle for kinks, rust, broken strands, and frayed ends, and check the housing for bent ends, cuts, stretched coils, and wear. Replace any part which does not pass inspection.
Every month inspect the brake pads on your bicycle for wear. Brake pads have shallow grooves in their braking surface. If any of these grooves are less than 2 mm deep, replace the pads.
Every 3 months tighten the bolts to the torque specifications.
|
|
Figure 5: Brake pad alignment |
1. Hold the 13mm centering nut with a wrench.
2. Loosen the arm fixing bolt with a 5mm allen wrench.
3. Rotate the centering nut (Figure 1).
4. Re-tighten the bolt.
1. Loosen the brake pad fixing bolt.
2. Follow the procedures in Inspection to align and tighten the brake pads.
3. After the brakes are adjusted, test the brakes.
Apply maximum braking force to the levers. Ensure the cable does not slip, the pads close toward the rim at right angles, and the pads do not contact the tire.
Every 3 months lubricate your brake arm fixing pivots with a light chain oil or a similar light oil.
Whenever a cable is replaced, lubricate the cable with a thin layer of synthetic bicycle grease or a similar lubricant.