|
|
Figure 1: Parts of the bicycle drivetrain |
The chain (Figure 1) connects the crankset to the cassette or rear cog.
|
|
Figure 1: Parts of the bicycle drivetrain |
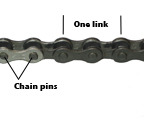
Once a month check that the chain is clean, free of rust, and properly oiled. All links of the chain should pivot smoothly and without squeaking, and no links of the chain should be deformed. The chain pins (Figure 2) should extend the same distance from the chain plates on both sides of the chain.
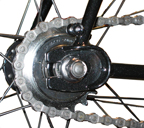
Once a month with a bicycle that does not have a rear derailleur, check the chain tension. When grasped in the middle of the chain run between the front and rear sprockets, there should be between 1/4 and 1/2 inches (6-12 mm) total vertical movement (Figure 3).
Every 3 months check your chain for wear with a chain wear gauge or a ruler. Each full link (Figure 2) of a new chain measures one inch. If 12 links of your chain measures 12 1/8 inches (308mm) or more, the chain should be replaced. With good maintenance, a chain usually lasts 1000 to 1500 miles (1600-2400km) on a road bicycle, less on heavy-use bicycles like mountain bicycles, or if the chain is not kept clean and lubricated. As the chain becomes worn, it creates extra wear of other drivetrain components like the cassette and chainrings, so keep the chain in good condition and replace it when necessary. Replacing the chain takes special tools and training and should only be done by your Trek dealer.
|
|
Figure 2: Parts of the chain |
|
|
Figure 3: Checking the chain tension |
Adjust the tension of the chain when you install the rear wheel or when the chain tension does not meet the Inspection requirements. For bicycles with a rear derailleur, the chain does not require adjustment.
For single-speed bicycles, adjust the chain tension.
For single-speed mountain bikes, adjust the chain tension with adjustable dropouts.
Some bicycles are equipped with horizontal dropouts, where the wheel can slide forward or backward to change the tension of the chain (Figure 3). If your bicycle does not have horizontal dropouts, see the instructions for adjustable dropouts.
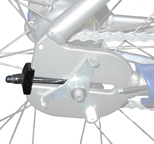
1. Gradually loosen the rear wheel axle nuts (Figure 4) on alternate sides of the wheel.
2. Slide the wheel to re-tension the chain, and center the wheel in the frame.
Some models have a chain tensioning device which helps position the wheel.
There should be about 0.5 inches (12mm) total up-and-down movement in the middle of the chain run (Figure 4).
3. Follow the Inspection and Adjustment procedures in the Wheels section to re-install the wheel.
|
|
Figure 4: Wheel axle nut in horizontal dropout of track bike |
There are a variety of ways to adjust the chain tension, depending on the design of your bicycle. Choose the method that is accommodated by your bicycle:
· With dropout adjusters
· With vertical dropouts and a bottom bracket eccentric
· With adjustable dropouts
For an adult trike, adjusting the chain tension requires special tools and training, so this should only be done by your dealer.
For some bicycles, the chain tension can be easily adjusted by turning the chain adjuster on the dropouts (Figure 5). First, loosen the axle nuts. Then turn the tension adjusters to change the chain tension and align the wheel in the frame. When the correct chain tension is achieved, tighten the axle nuts.
|
|
Figure 5: Chain tensioner |
Identify the expander bolt on the bottom bracket eccentric (Figure 6). Loosen this bolt several turns until the eccentric can be rotated. Place an allen wrench in one of the eccentric rotator holes and rotate the eccentric until the desired chain tension is achieved. Retighten the expander bolt to the torque specifications.
|
|
Figure 6: Bottom bracket chain adjuster |
Once a month clean and oil the chain. When lubricating or cleaning your chain, always place a rag behind the chain to avoid getting oil on the rest of the bicycle. Use a synthetic chain oil or similar lubrication. After oiling your chain, wipe off the excess oil with a rag. Done vigorously, this will also clean your chain.
Do not clean your chain with solvents. Many solvents can damage the finish of your bicycle, so the part should be removed from the bicycle before cleaning. Removing a chain takes special tools and skills, so we recommend that you not perform this procedure.