Figure 1:
Direct-connect type stem
The stem (Figure 1) attaches the handlebar, the part you hold with your hands when riding a bicycle, to the fork. In addition, the stem works with the handlebar to define your position on the bicycle. Information on proper positioning of the parts is found in the section Fitting the bicycle. This section explains how to inspect, adjust, and lubricate your stem. If you are unsure of the safety of your stem, do not ride the bicycle; take the bicycle to your dealer for adjustments.
Read the Warning About Mechanical Work before performing any service work on your bicycle.
Warning—An improperly adjusted or tightened stem can cause you to lose control and fall. Make sure the stem is positioned and tightened properly before riding the bicycle.
Stems are attached to the bicycle in several ways:
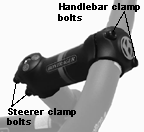
· Outside clamp: Direct-connect stems clamp to the outside of the fork steerer (Figure 1).
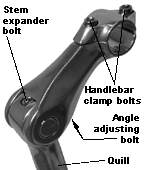
· Inside clamp: Quill stems have a tube, or quill, clamped inside the fork by an expanding wedge (Figure 2).
|
|
Figure 1: Direct-connect type stem |
|
|
Figure 2: Quill type stem |
Before every ride, follow the pre-ride checklist and check the stem for signs of stress or fatigue.
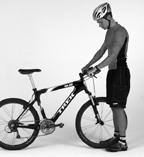
Once a month make sure the stem is in alignment with the front wheel. Test the stem connection to the fork by attempting to turn the handlebar from side to side with the front wheel locked between your knees (Figure 4). Test the security of the handlebar by attempting to rotate it in the stem.
Check that all bolts are tight. The correct tightness varies according to the type of stem on your bicycle; follow the torque specifications. If you are unsure of which type of stem your bicycle is equipped with, consult your Trek dealer.
|
|
Figure 4: Test for rotation of handlebar in stem and stem on steerer |
To determine the best position of the stem (and handlebar), see Fitting the bicycle.
The angle of the handlebar affects hand and arm comfort.
1. Loosen the handlebar clamp bolt(s) on the stem just enough that the handlebar can be rotated in the stem.
2. Position the handlebar to the desired angle, making sure they are centered in the stem.
3. Tighten as shown in Inspection.
4. If needed, reposition the brake and shift levers.
Changing the height of the handlebar requires that you move the stem. The two types of stems, quill and direct-connect, have different procedures for moving them.
With this type of stem, moving the stem affects the headset bearing adjustment. This procedure requires special tools and training so this should only be done by your Trek dealer. If you choose to perform this procedure, use the proper number of spacers to protect the fork steerer, as explained on the Fork page.
For the adjustable-rise stem in Figure 6, first change the stem angle, which gives access to the stem expander bolt.
1. Loosen the stem expander bolt two to three turns.
2. Tap the top of the stem expander bolt with a wood or plastic-faced mallet to loosen the stem wedge.
3. Adjust the handlebar to the desired height, but with the minimum insertion line inside the frame (Figure 7). A minimum of 2 3/4 inches (70 mm) of the stem quill must always remain in the frame.
4. Tighten as shown in Inspection.
|
|
Figure 7: Minimum insertion mark |
Once a year, lubricate the stem.
Note: Lubricating a direct-connect stem requires adjustment of the headset bearings, so should only be done by your Trek dealer.
1. Follow the instructions To change the handlebar height with a quill stem, and remove the stem from the frame.
2. Wipe any old grease off the stem, and clean it.
3. Apply a thin layer of synthetic grease or a similar lubrication to the section of the quill that will be inserted into the frame, including the stem wedge.
4. Insert the stem into the frame, and follow the instructions To change the handlebar height with a quill stem.