Figure 1:
Tubeless valve stem
Chapter 3: inspection, adjustment, and lubrication
These instructions explain how to install and remove a Bontrager TubeLess Ready valve stem with a TubeLess Ready rim strip into a
TubeLess Ready rim. Only use a Bontrager TubeLess Ready rim strip that has not been damaged. Before installation, check the TubeLess Ready rim strip for tears, holes or deformed areas near the valve hole or along its edges.
To open the air valve, follow the instructions for the valve type on your bicycle.
1. Find the valve hole of the rim strip and place that section of rim strip in the rim, over the valve hole. If the rim is assymetric, make sure the rim strip is also assymetric and the valve hole is lined up on the correct side of the rim.
2. Center the rim strip in the rim and work the rim strip into position with the valve holes aligned.
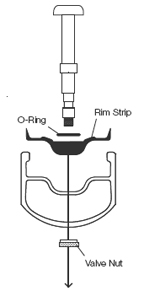
3. Place the O-ring (Figure 1) on the valve stem.
3. Press the valve stem through the rim strip and the rim.
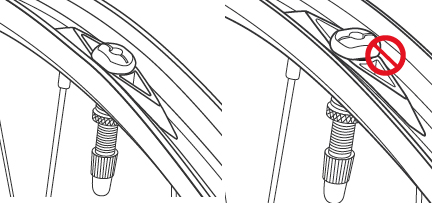
4. Align the slot on the head of the tubeless valve stem with the rim (Figure 2).
5. Thread the valve nut (Figure 1) onto the valve, and tighten firmly by hand. There should be no gap between the valve and the rim strip.
Use your fingers to tighten the valve nut. Don’t use pliers—if you puncture on the trail, you will have to be able to remove the nut by hand.
6. Using only your thumbs, work your way around the rim away from the valve stem in both directions, pressing the rim strip into place.
7. Make sure the rim strip is smooth, even, and centered in the rim well.
|
|
Figure 1: Tubeless valve stem |
|
|
Figure 2: Correct alignment of valve stem in rim |
1. Remove the valve nut (Figure 1).
2. Thread the presta nut into the valve stem (to the Closed position).
3. Push the stem out of the rim.