Figure 1:
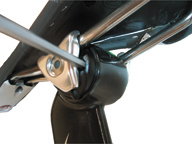
Seat mast incorrectly adjusted: above the minimum insertion mark and showing light through the window
Instead of a standard seatpost that can be slid up and down inside the frame, some bicycles use a seatmast that can be slid up and down outside of the frame.
Read the Warning about Mechanical Work before performing any service work on your bicycle.
Every month inspect the seatmast binder bolts (Figure 1) and seat fixing bolt (Figure 2) for proper tightness. Make sure the seat is secure by attempting to move the seatmast on the frame, and attempt to move the front of the seat up and down. If the seat rotates, is loose, or moves up and down, tighten the binder bolts or seat fixing bolt, and repeat the test.
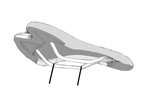
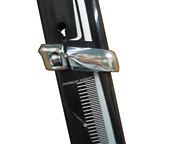
The saddle is supported by two rails, metal strips or rods. The rails have a flat section that is designed to fit the seatpost clamp (Figure 3). Do not clamp the curved part of the rails in the seatpost clamp. Make sure the seatpost is only attached to the flat, or straight, part of the rails. If the saddle is clamped incorrectly, an unusual amount of force will be created that could cause the saddle or the seatpost to break.
Some saddles have oversize saddle rails, with a larger diameter to provide extra strength. These saddles require a special seatpost to accommodate the larger rails. Using the a seatpost with the wrong size of saddle rail clamp could cause the saddle to break or come loose unexpectedly. If you are not sure if your seat mast will accommodate your saddle, consult your dealer.
|
|
Figure 1: Seat mast incorrectly adjusted: above the minimum insertion mark and showing light through the window |
|
|
Figure 2: Using a 5mm allen wrench to unlock the seat mast cups |
|
|
Figure 3: Saddle rails showing the flat or straight area for clamping |
You can easily adjust the height of the saddle. Loosen the clamp bolts on the seatmast cap and slide the cap up or down as necessary. Do not raise the cap above the minimum insertions mark, or such that light can be sen through the window of the seat mast cap.. When the cap is at the right height, gradually tighten the clamp bolts in an alternating pattern to the torque specifications.
If the seatmast cap does not provide enough adjustment, optional caps with different lengths and setbacks are available for purchase from your dealer.
As with a “normal” saddle post, the saddle rail clamp on the seatmast cap of the Madone provides a wide adjustment of saddle tilt. The adjustment system uses a “ball and socket” system (Figure 2) to provide precise angular adjustment.
The Madone saddle rail clamp also provides several degrees of lateral angle adjustment so you can align the saddle (Figure 2). The saddle rail clamp is a mating ball and socket system that is easy to use.
1. Tighten the saddle rail clamping bolt just enough to keep the assembly from rattling.
2. Tap the front or the back of the saddle to adjust the fore-aft position.
3. Tap the nose of the saddle to align, either horizontally or vertically.
4. When the saddle is in the desired position, hold the saddle and tighten the saddle rail clamping bolt to the torque specifications.
Before making this adjustment, note the angle of the saddle. Sliding the saddle fore or aft might change the angle, so you may have to re-adjust it.
The saddle is supported by two metal strips or rods called "rails." The rails have a flat section that is designed to fit the seatpost clamp (Figure 2). Do not place any other part of the rails in the seatpost clamp.
Warning—A seatmast that is positioned incorrectly can break the saddle rails and can cause you to lose control and fall. Only clamp the straight, flat portion of the saddle rails in the seatmast clamp.
1. Loosen the seat fixing bolt just far enough so that you can slide the seat fore and aft.
After loosening the seat fixing bolt, apply pressure to the top of the saddle directly above the clamp. This will loosen the clamping mechanism.
2. Slide the saddle fore or aft in the saddle clamp.
3. Re-tighten the seat fixing bolt as in Inspection.
Once the saddle rail clamp bolt has been tightened, the clamp mechanism will lock into place. When you loosen the clamp bolt, the mechanism might not unlock.
1. Loosen the saddle rail clamp bolt until the outer clamp plate allows you to insert a 4 mm hex wrench in one of the holes in the adjusting ball (Figure 2).
2. Push lightly on the allen wrench until the cup releases from (moves in) the carbon cap.
3. Follow same procedure for the other side of the clamp.
4. Follow the procedure “To Adjust the Saddle Angle.”
Lubricate the seatmast every year.
Every six months, remove the seatmast cap and clean the exterior of the seat tube with a damp cloth.
For parts made of carbon fiber composite, read the section on Carbon Composite Inspection and Use.