|
|
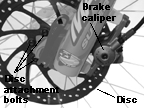
Figure 1: Disc brake |
This system consists of several parts:
· Brake lever
· Brake cable and housing
· Brake caliper and disc
The following information is only meant to supplement the brake manufacturer’s manual.
Because they are part of the braking system, also read about brake levers.
|
|
Figure 1: Disc brake |
Disc brakes may be very hot after use, so use care when inspecting them. As with other rotating parts on a bicycle, avoid placing your fingers in the disc.
Warning—Disc brakes and discs get very hot during use and could burn skin. Also, the disc edges may be sharp and could cut skin. Avoid touching the disc or disc brake when hot, or when rotating.
Before every ride squeeze the brake lever firmly. It should not be possible to pull the lever fully to the handlebar.
The disc (Figure 1) is part of the braking system, so keep it clean at all times. Check that there is no oil, grease, or other dirt on the disc. Remove the brake pads from the caliper during heavy cleaning. Do not use cleanser, de-greaser, or solvents to clean the disc. To clean discs, use isopropyl alcohol.
Once a month inspect disc brake pads for wear. If disc brake pads are less than 1.0 mm thick, replace the pads. Check that the brake pads are in proper position, allowing 0.25 to 0.75 mm clearance from the disc when the brakes are not applied (Figure 2). Spin the wheel; when the brake lever is not pressed, the brake pads should touch the disc as little as possible.
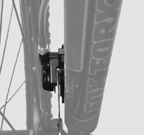
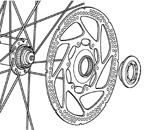
Every month tighten the brake attachment bolts (Figure 3), and the disc attachment bolts (Figure 1) or centerlock attachment nut (Figure 4), to the torque specifications.
Every month check the brake cables on your bicycle for kinks, rust, broken strands, and frayed ends, and check the housing for bent ends, cuts, stretched coils, and wear. Replace any part which does not pass inspection.
|
|
Figure 2: Disc brake pad clearance |
|
|
Figure 3: Disc brake attachment bolts |
|
|
Figure 4: Centerlock disc brake attachment |
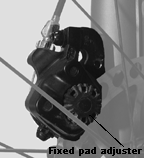
Turn the fixed pad adjuster (Figure 5).
After making this adjustment, you may need to adjust the left pad clearance.
|
|
Figure 5: Fixed pad adjuster |
1. Turn the cable barrel adjuster. To increase the pad clearance, turn the barrel adjuster in (clockwise). To reduce the pad clearance, turn the barrel adjuster out (counter-clockwise).
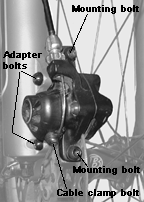
2. If the pads cannot be adjusted properly in this manner, loosen the cable clamp bolt and re-attach the cable as explained in To install a brake cable, but without removing the cable.
3. After adjustment, turn the locking nut clockwise to help prevent rotation of the barrel adjuster.
1. Loosen the brake mounting bolts.
2. Slide a business card, or similar thin object, between the right brake pad and the disc.
3. Apply the lever fully while you gradually tighten each mounting bolt as specified in Inspection.
1. Remove the wheel.
2. With your fingers, or thin-tipped pliers, grasp the installation tang (Figure 6) of the brake pad and pull out.
|
|
Figure 6: Removing disc brake pads |
Every 3 months, lubricate the part of the brake caliper that rotates when the brake lever is pulled with a light oil. See your Trek dealer for a recommended oil. Be careful not to get oil on any other part of the brakes.