|
|
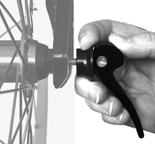
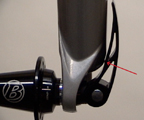
Figure 1: Parts of a Clix quick-release Spring placed with small end toward outside of hub |
Chapter 3: inspection, adjustment, and lubrication
A Clix quick-release functions differently from a traditional quick-release, and has parts that are different including a cup and a locking nut (Figure 1). Read and follow these instructions carefully. If you do not understand the instructions, or have questions, consult your Trek dealer. This page explains the Clix and its use:
· Explanation of the Clix quick-release
· Wheel installation and removal with a Clix
|
|
Figure 1: Parts of a Clix quick-release Spring placed with small end toward outside of hub |
With a traditional quick-release, the release force (determined by the length of the quick-release) must be re-adjusted each time you install the wheel. With the Clix system, this adjustment is usually not necessary. The Clix creates an integrated system that should not need to be re-adjusted when the wheel is installed.
However, with the Clix system the release force is adjusted to a specific fork—adjusted to the width of the dropouts (the parts of the fork that hold the wheel). The adjustment is only correct for one specific fork, so do not use this Clix on another fork unless it has been re-adjusted for the new fork.
Warning Moving your Clix to a different bicycle, wheel, or fork without correct re-adjustment could cause the Clix to break. Do not move the Clix to a different bicycle, wheel, or fork without correct re-adjustment.
· Perform the Quick Check before every ride.
· Inspect and adjust the Clix quick-release every six months. Follow the steps to prepare your Clix quick-release for use, make sure the locking nut is in contact with the adjusting nut, and ensure the system is in good working condition and free of damage.
If the Clix quick-release is installed in the hub and correctly adjusted, the wheel is ready to be used in the bicycle.
Start by opening the brake.
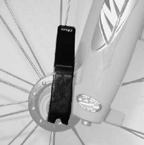
1. Squeeze the cup and lever together (Figure 2) and gently lower the fork onto the hub until the fork dropouts are resting on the hub axle.
Some forks have dropouts with special ramps that allow the fork to slide onto the hub without squeezing the cup to the lever.
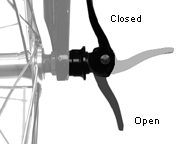
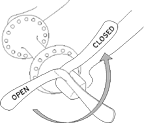
2. Swing the lever (Figure 4) to the CLOSE position (Figure 3).
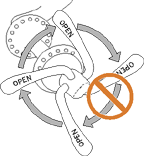
Do not tighten the quick-release by turning the lever like a wing nut (Figure 4); it will not result in sufficient force to hold the wheel in place.
3. Check that the word CLOSE is facing away from the bicycle and that the lever is pushed fully to the CLOSE position.
4. Put the quick-release lever where it does not touch another bicycle part or accessory part (such as rack or fenders), and where it can not catch on objects (Figures 6 and 7).
If necessary, re-install the wheel with the quick-release lever on the other side of the bicycle, or speak to your dealer about a quick-release that closes correctly and does not touch the bicycle (Figure 6).
5. Do a Quick Check to make sure you have correctly closed the quick-release.
If the wheel does not pass any test, either re-adjust the quick-release, or take the bicycle to your dealer for service.
6. Close the front brake and make sure the brake is working properly before riding.
|
|
Figure 2: Hub in dropout, squeezing the cup and lever together |
|
|
Figure 3: Positions of the lever |
|
|
Figure 4: Swinging motion of quick-release lever |
|
|
Figure 5: Do not rotate the lever to tighten |
|
|
Figure 6: The lever must not contact the fork |
|
|
Figure 7: Alignment of the front quick-release lever |
1. Open the brake.
2. Swing the lever from the CLOSE position to the OPEN position.
3. Squeeze the cup and lever together (Figure 2) to allow the adjusting nut and cup to move out of the fork dropouts.
4. Lift the fork off the hub.
The wheel will slide past the fork dropouts and come out.