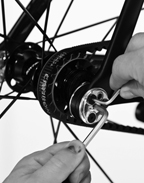
Figure 1:
Three dropout clamp screws secure each dropout to the frame
Adjust the tension of the belt when you install the rear wheel or when the belt tension does not meet the Inspection requirements.
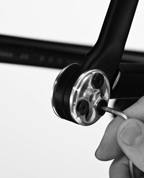
With a rotating dropout, there are two hemispheres of adjustment with the axle either above or below the center of the dropout. The hemisphere you choose affects the bottom bracket height; if the axle is higher than the center of the dropout, the bottom bracket will be lower, and vice versa.
Also note that rotating a dropout changes both the alignment and the tension simultaneously.
With the drive-belt aligned correctly on the front sprocket, follow these steps:
1. Test the alignment and note any movement of the drive-belt on the rear sprocket. Also test the belt tension.
2. Determine which dropout needs adjustment:
|
|
Belt tight |
Belt loose |
|
Rim to left |
Rotate left dropout forward |
Rotate right dropout backward |
|
Rim to right |
Rotate left dropout forward |
Rotate right dropout backward |
3. Loosen the dropout clamp screws (Figure 1) and rotate the dropout (Figure 2) to change the alignment and belt tension.
4. After the correct alignment and tension are achieved, tighten the dropout clamp screws to torque specifications.
5. Follow the instructions To test drive-belt tension.
If you cannot achieve the correct belt tension, take your bicycle to your dealer for service.
|
|
Figure 1: Three dropout clamp screws secure each dropout to the frame |
|
|
Figure 2: Rotate the dropout with an allen wrench placed in the center |