Figure 1:
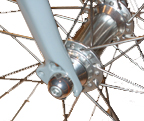
Coaster brake parts
Chapter 3: inspection, adjustment, and lubrication
Begin by opening the brake type(s) on your bicycle:
When loosening and tightening the axle nuts, do so gradually, in small increments, to prevent effecting the bearing hub adjustment.
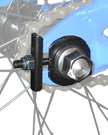
For coaster brakes, begin by removing the brake strap attachment bolt (Figure 1). Some bolt-on hubs use a recessed allen-wrench bolt (Figure 1).
1. Slightly loosen the axle nut on one side of the hub by about 1/4 turn.
2. Slightly loosen the axle nut on the other side of the hub about 1/4 turn.
3. Continue loosening the axle nuts in small increments until you can slide the hub from the dropouts.
With bicycles equipped with training wheels, there is a second set of axle nuts under the training wheel brackets. Loosen and remove them in the same manner.
4. Slide the wheel forward to create slack in the chain, and lift the chain off the rear cog.
5. Slide the wheel out of the dropouts.
|
|
Figure 1: Coaster brake parts |
|
|
Figure 2: Axle bolt with allen-wrench fitting |
1. Loop the chain over the hub (not the rear cog), and slide the hub into the dropouts.
2. Push the wheel fully forward, lift the chain onto the rear cog, and pull the wheel back until the proper chain tension is achieved.
3. While holding the wheel straight in the frame, maintain chain tension and reverse the instructions for removing the wheel, including gradual tightening of the axle nuts.
Do not fully tighten the axle nuts yet.
4. If necessary, re-tension the chain.
If the bicycle has chain tensioners (Figure 3), use them.
If the bicycle is equipped with training wheels, follow the instructions to re-adjust training wheels and tighten the secondary axle nuts.
5. Tighten the axle nuts to the torque specifications. To avoid changing the adjustment of the wheel bearings, tighten gradually: tighten one side of the wheel a small amount, then tighten the other side a similar amount. Repeat, from side to side, until the axle nuts are correctly tightened.
|
|
Figure 3: Chain tensioner |
1. Pick up the bicycle, and sharply hit the top of the tire (Figure 4). The wheel must not come off, be loose, or move from side to side.
2. Spin the wheel to see that it is centered and the wheel turns freely without rubbing.
|
|
Figure 4: Test for looseness |
1. Close the brake.
1. Re-install the coaster brake arm.
2. Make sure the brake is working properly: