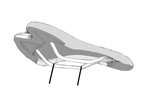
Figure 1:
Seat and seatpost
This section explains how to inspect, adjust, and lubricate your saddle.
Some saddles have oversize saddle rails (Figure 2), with a larger diameter to provide extra strength. These saddles require a special seatpost to accommodate the larger rails. Using the a seatpost with the wrong size of saddle rail clamp could cause the saddle to break or come loose unexpectedly. If you are not sure if your seatpost will accommodate your saddle, consult your dealer.
Read the Warning About Mechanical Work before performing any service work on your bicycle.
|
|
Figure 1: Seat and seatpost |
|
|
Figure 2: Saddle rails showing the flat or straight area for clamping |
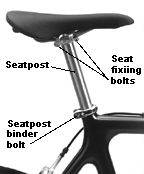
Every month make sure the seat is secure by attempting to turn the seat in the seatpost, and attempt to move the front of the seat up and down. If the seat rotates, is loose, or moves up and down, tighten the seat fixing bolts, or inspect the seatpost, and repeat the test.
Tighten the seat clamp bolts of the seatpost to the torque specifications for your bicycle.
If your bicycle has a carbon fiber seatpost, also follow the carbon fiber composite inspection procedures.
Information on proper positioning of the parts is found in the section Fitting the bicycle.
Follow the instructions to adjust the seatpost.
For the new Madone, follow the instructions to adjust the seat mast.
A saddle has rails, a pair of tubes, (Figure 2) that are clamped by the seatpost. Make sure the seatpost is only attached to the flat, or straight, part of the rails. If the saddle is clamped incorrectly, an unusual amount of force will be created that could cause the saddle or the seatpost to break.
The connection between the seat and seatpost does not require lubrication.