|
|
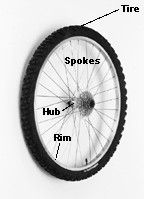
Figure 1: Wheel and parts |
The wheels (Figure 1) of a bicycle allow the bicycle to roll down the road smoothly, so their integrity and structural soundness is crucial. In addition, their relationship to the performance of your brakes is of great importance. These instructions explain how to inspect, adjust, and lubricate the wheels of a bicycle. Instructions for removing and installing standard 'clincher' tires are included. Read the Warning about Mechanical Work before performing any service work on your bicycle.
If your bicycle has special wheels with tubular tires or carbon fiber composite rims, read those sections for additional information.
|
|
Figure 1: Wheel and parts |
If your bike is equipped with the FCC system, your fork and front wheel are integrated with special parts to add steering precision and control (Figure 2). The front wheel has a hub with special, large-diameter end caps and wider flange spacing. The larger end caps work to prevent twisting of the fork legs. The wider flanges give the spokes a wider bracing angle to make the wheel more laterally stiff. However, these same special features render the FCC front wheel incompatible with other forks.
You can put a standard wheel into an FCC fork. Make sure the wheel is compatible with the bicycle before you do so.
If you put an FCC wheel in a standard fork, the spokes may contact the fork and interfere with the rotation of the wheel. Also the end caps may prevent the wheel from correct placement in the dropouts.
Warning—Placing an FCC front wheel in a standard fork may cause the wheel to come loose or suddenly stop turning. Only use the FCC front wheel with an FCC fork.
|
|
Figure 2: FCC wheel and fork interface: wider hub flanges and larger hub end caps require a special FCC fork |
The best maintenance of a wheel is preventative maintenance. Be aware of the things that can go wrong so you can stop trouble before it happens.
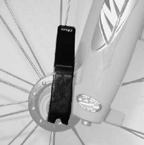
Check that the levers of your quick-release hubs (Figure 3) are in their CLOSE (locked) position. There are many types of quick-release devices, such as Clix, ABP, QR15, and Maxle. For further information on adjusting quick-release devices, see the quick-release overview, or consult your Trek dealer.
Warning—A quick-release that is not properly adjusted and closed can let the wheel be loose or come off when not expected, which can cause you to lose control and fall. Check the attachment of your wheels before you ride the bicycle.
Check that the wheels are straight and round by spinning them. If the rim (Figure 1) does not spin evenly, have your wheel trued (straightened) by your Trek dealer.
Make sure your tires are inflated to the pressure indicated on the tire sidewalls. Use a gauge and a bicycle pump whenever possible. Avoid filling your tires at gas stations; because of the greater pressure and volume of air their pumps release, blowouts are very possible.
Inspect your tires for wear and any other damage. If a tire has any cuts or separations which go through the tire, making any part of the inner tube visible, or if any part of the tire casing shows through the tire tread (running surface) or knobs are worn or missing, replace the tire.
Make sure your rims are clean. Dirty or greasy rims render your brakes ineffective. Wipe your rims with a clean rag or wash them with soap and water, rinse, and let them air dry.
Also check the cassette.
|
|
Figure 3: Example of one type of quick-release lever |
|
|
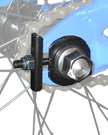
Figure 4: Example of one type of bolt-on axle |
Make sure there are no loose, damaged, or broken spokes. If a wheel is not in good condition, both the effectiveness of the brakes and the strength of the wheel are greatly reduced.
Check your rims for wear. New rims have a flat braking surface. With wear, the braking surface will become dished or indented, which you can feel with your fingers. There may be wear indicators in the braking surface, which are different for aluminum and carbon fiber rims:
· For aluminum rims, look for a continuous indented band or several small spherical indentations at even intervals around the rim.
· For carbon fiber rims, look for gaps in the "scrim"- gaps work as wear indicators. The scrim is an interwoven material, and is placed for its braking properties. Underneath the scrim, the carbon fibers are straight and parallel, as seen in the parts of the rim found away from the braking surface.
If the braking surface has worn so that any part of these indicators is no longer visible, or for carbon fiber rims there is a gap in the scrim, have your dealer replace the rim.
Warning—Brake pads remove rim material when the brake is applied. If too much material is removed, the rim may become weak and break suddenly, causing a loss of control. Regularly inspect your rims for wear and replace them when they are worn.
Check that both hub bearings are properly adjusted. Lift the front end of the bicycle off the ground with one hand and attempt to move the rim laterally, left to right. Look, feel, and listen for any looseness in the hub bearings. Spin the wheel, and listen for any grinding or other unusual noises. If the hub feels loose or makes any noise, the hub needs an adjustment. Repeat these procedures for the rear wheel.
Warning—An improperly adjusted hub, where there is movement between the hub and axle, can cause you to lose control and fall. Inspect the hubs thoroughly before every ride, and do not ride the bicycle until any problem has been corrected.
Before installing tires make sure a rim strip is in place which completely covers the rim web (wall to wall) so that all spoke holes or spoke heads are completely covered.
Warning—Make sure the rim strip covers all of the spoke holes or spoke heads. If they are exposed, the inner tube could be punctured and lose air suddenly causing you to lose control and fall. Make sure the rim strip properly covers all spoke holes.
This procedure requires special tools and training, so should only be done by your Trek dealer.
For proper and safe adjustment of a quick-release, read and follow the quick-release instructions carefully.
Warning—A quick-release that is not properly adjusted and closed may allow the wheel to be loose or come off unexpectedly, causing you to lose control and fall. Check the attachment of your wheels before you ride the bicycle.
Some rims require a long valve stem or a valve extender to inflate the inner tube. If the valve stem on your inner tube is too short, see your dealer.
If you cannot keep the proper pressure in a tire, it probably has a leak in the tube. The section Tire Installation includes instructions to fix the tube leak. For tubular (sew-up) tires that are leaking, read the Tubular Instructions.
If you do not have the proper tools, take the bicycle to your Trek dealer for repair.
Every year, re-grease wheel bearings. This requires special tools and training, so should only be done by your Trek dealer.
Every year, lubricate wheel quick-releases. Apply several drops of SynLube or a similar light oil where the quick-release lever rotates in the quick-release body.