Figure 1:
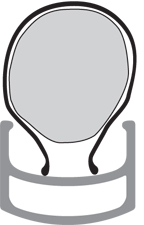
Tire beads in the bottom of the rim well
Chapter 3: inspection, adjustment, and lubrication
These instructions are written for standard clincher, or wired-on, wheel systems where the air inside the tire is contained in an inner tube, and the tire and tube are two separate pieces. For tubular tires, where the tube is stitched inside the tire's casing making a single piece, follow the tubular tire installation instructions.
Follow these steps when repairing or replacing a tube in the event of a flat tire (punctured inner tube), or when replacing a worn tire.
Follow the instructions to open the brake that controls the wheel.
Follow the instructions to remove a wheel.
Follow the instructions for the valve type on your bicycle.
Remove the tire from the rim with your hands, or tire levers. Do not use sharp objects such as a screwdriver to remove the tire.
1. Deflate the inner tube completely.
2. Squeeze the tire beads into the bottom of the rim well (Figure 1). Work your way all around the wheel.
3. Lift one tire bead out of the rim with a tire lever. Start opposite the valve.
4. Continue around the wheel to lift the bead out of the rim until one bead is completely free (Figure 2).
5. Reach up into the tire and remove the inner tube.
6. Remove the second tire bead from the rim.
|
|
Figure 1: Tire beads in the bottom of the rim well |
|
|
Figure 2: Remove the first bead from the rim |
If you are repairing a tube leak, repair the puncture on the tube with a tube patch, or replace the tube. If you are replacing the tube or tire, make sure the new tube or tire is the same size as the old one, or check with your Trek dealer for compatibility of differing sizes. The size can be found on the side of the tire.
1. Follow the Inspection procedures in the Wheels section to check the rim and inside of the tire.
2. Inflate the tube until it begins to take shape.
3. Place the tube in the tire.
4. Insert the valve stem through the hole in the rim.
5. Install the first bead onto the rim with your hands (Figure 2). Start at the valve stem.
6. Push the tire and tube over so the tube is inside the rim (Figure 3).
7. Push the second bead into the rim with your hands. Start at the valve stem.
Be careful not to pinch the tube between the rim and the tire (Figure 4) when mounting the tire.
8. Push the base of the valve stem up into the tire, so that it is inside the tire and not caught between the tire beads and the rim.
9. Inflate the tire to about half pressure and then check that the tire bead is properly seated in the rim (Figure 5).
10. Deflate the tire again. This will help avoid any pinching of the tube.
11. Inflate the tire to the pressure indicated on the side of the tire. Do not over-inflate.
You can also watch a movie of tire removal and installation.
|
|
Figure 3: Insert the tube into the rim |
|
|
Figure 4: Do not pinch the inner tube between the tire and the rim |
|
|
Figure 5: Install the second bead |